

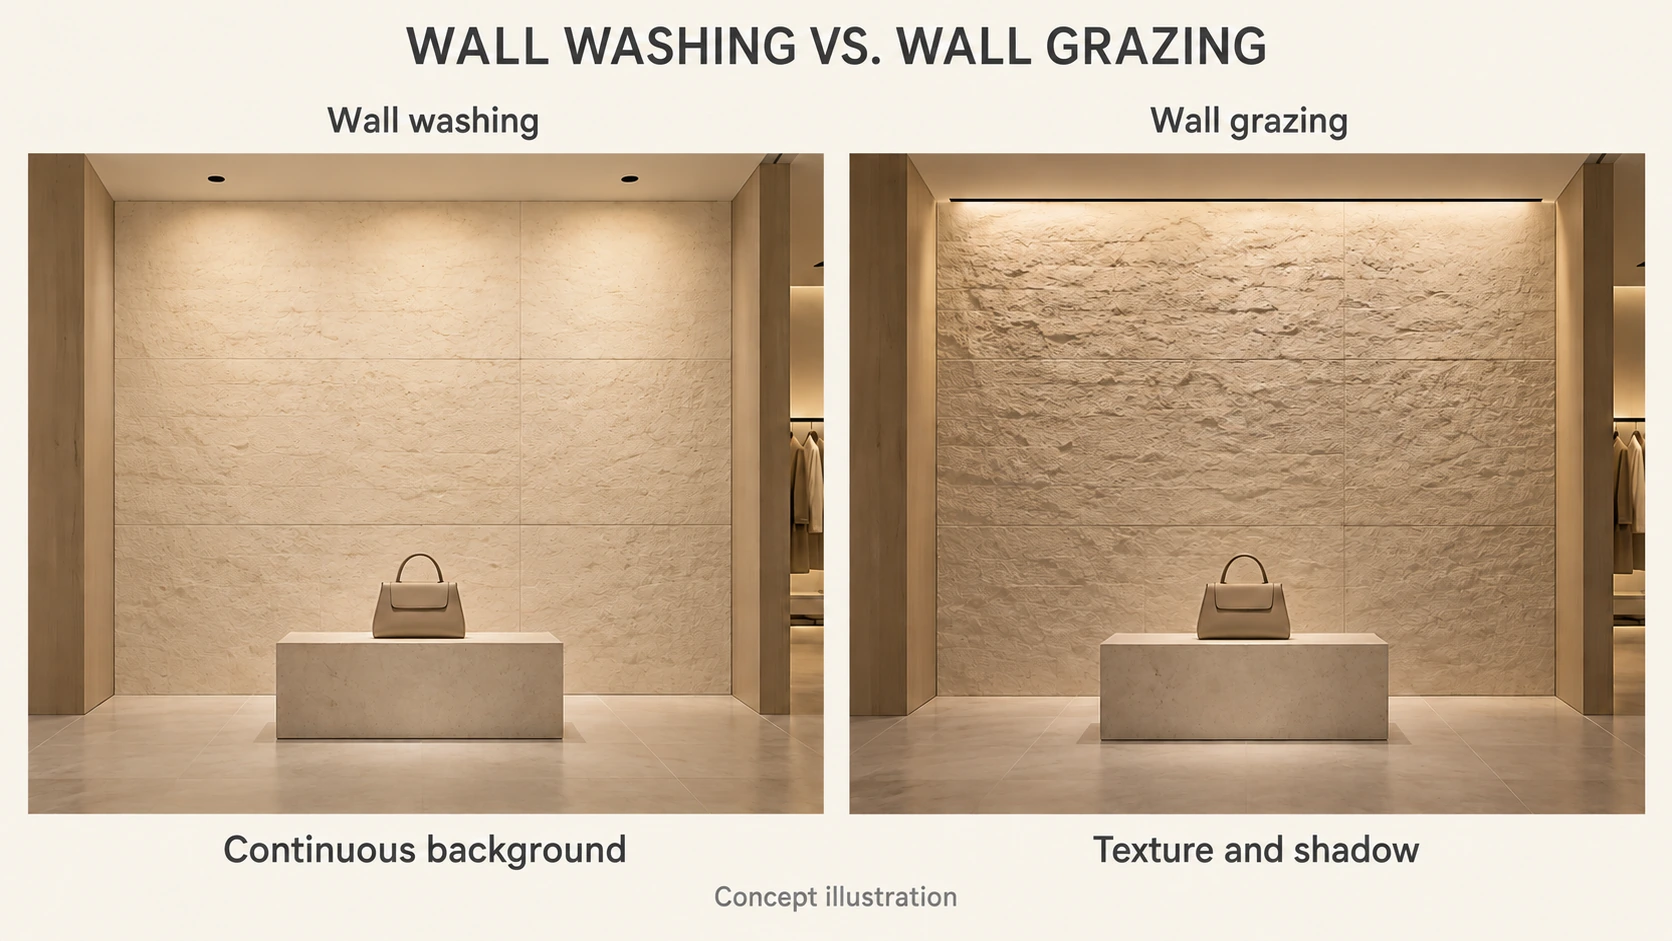
The same stone wall can look different when the direction of light changes. One arrangement may create a continuous background; another may make its relief, joints and shadows more noticeable. The right effect depends on the wall's role in the store.
If customers should notice the merchandise first, prominent texture and bright patches in the background may draw attention away from it. When the wall itself is a design feature, controlled shadows can help express the material's depth.
Choosing between wall washing and wall grazing starts with three questions: what should customers see, what is the final wall material, and what effect can the selected fixture produce from its actual mounting position? Photometric information and a representative wall mockup then help translate that intent into fixture positions, optical configurations and on-site adjustments.
1. Define the effect you want on the wall
Wall washing aims to provide relatively continuous, uniform illumination over a defined vertical area, creating a clear overall background. Review the upper, middle and lower portions of the wall, along with the transitions between adjacent beams, against the intended result.
Wall grazing typically uses light close to the wall and directed along its surface to emphasize the light and shadow created by relief. The focus is often the texture, depth and shadows formed by surface details.
LEDiL's architectural lighting optics guide also explains these effects in terms of even wall illumination and highlighting surface texture.
| What to compare | Wall washing | Wall grazing |
|---|---|---|
| Main objective | Establish a relatively continuous, uniform vertical background | Use light and shadow to express surface relief |
| Situations to consider | Flat background walls or wall areas that should be read as a whole | Stone, relief panels or textured finishes whose depth should be emphasized |
| Effect to observe | Vertical variation, lateral transitions, edges and corners | Whether texture is clear and shadows obscure details |
| Common review points | Local bright patches, bands, dark areas and merchandise obstructions | Whether joints or construction irregularities are too prominent, and whether highlights draw excessive attention |
These terms describe a design direction. Select the approach by considering the objective, material and distribution together: a textured wall can serve as a quiet background, while grazing light can reveal irregularities in a wall that otherwise appears flat.
Review the relationship between the wall and merchandise alongside our ambient and accent lighting guide for retail interiors.
2. Assess materials close to the final finish
A material sample helps compare color and surface treatment, but a small, perfectly flat piece may not represent the completed wall. Include representative joints, corners and the installed surface condition in the mockup where possible.
Record four aspects:
- Color and perceived brightness. View the actual wall material with the surrounding floor, display backgrounds and merchandise. Different materials can appear differently bright under the same illumination.
- Gloss and reflection. Polished stone, metal and glossy coatings may produce directional reflections. Check them from the entrance, aisle and close-view positions.
- Relief and texture direction. Vertical textures, horizontal grooves and irregular surfaces form different shadows as the direction of light changes.
- Joints and completed workmanship. Material transitions, local projections and repaired areas may become more noticeable under light directed close along the surface.
For example, a textured stone brand wall could be reviewed with two arrangements: one that keeps the surface relatively continuous as a bright background, and another that emphasizes texture with more directional light. Include the brand lettering, display plinth and representative merchandise to judge which effect supports the display objective.
For a glossy background, also check whether it reflects fixtures or surrounding bright surfaces toward the main viewing positions. Where the display includes glass, see our glass display lighting and reflection review.
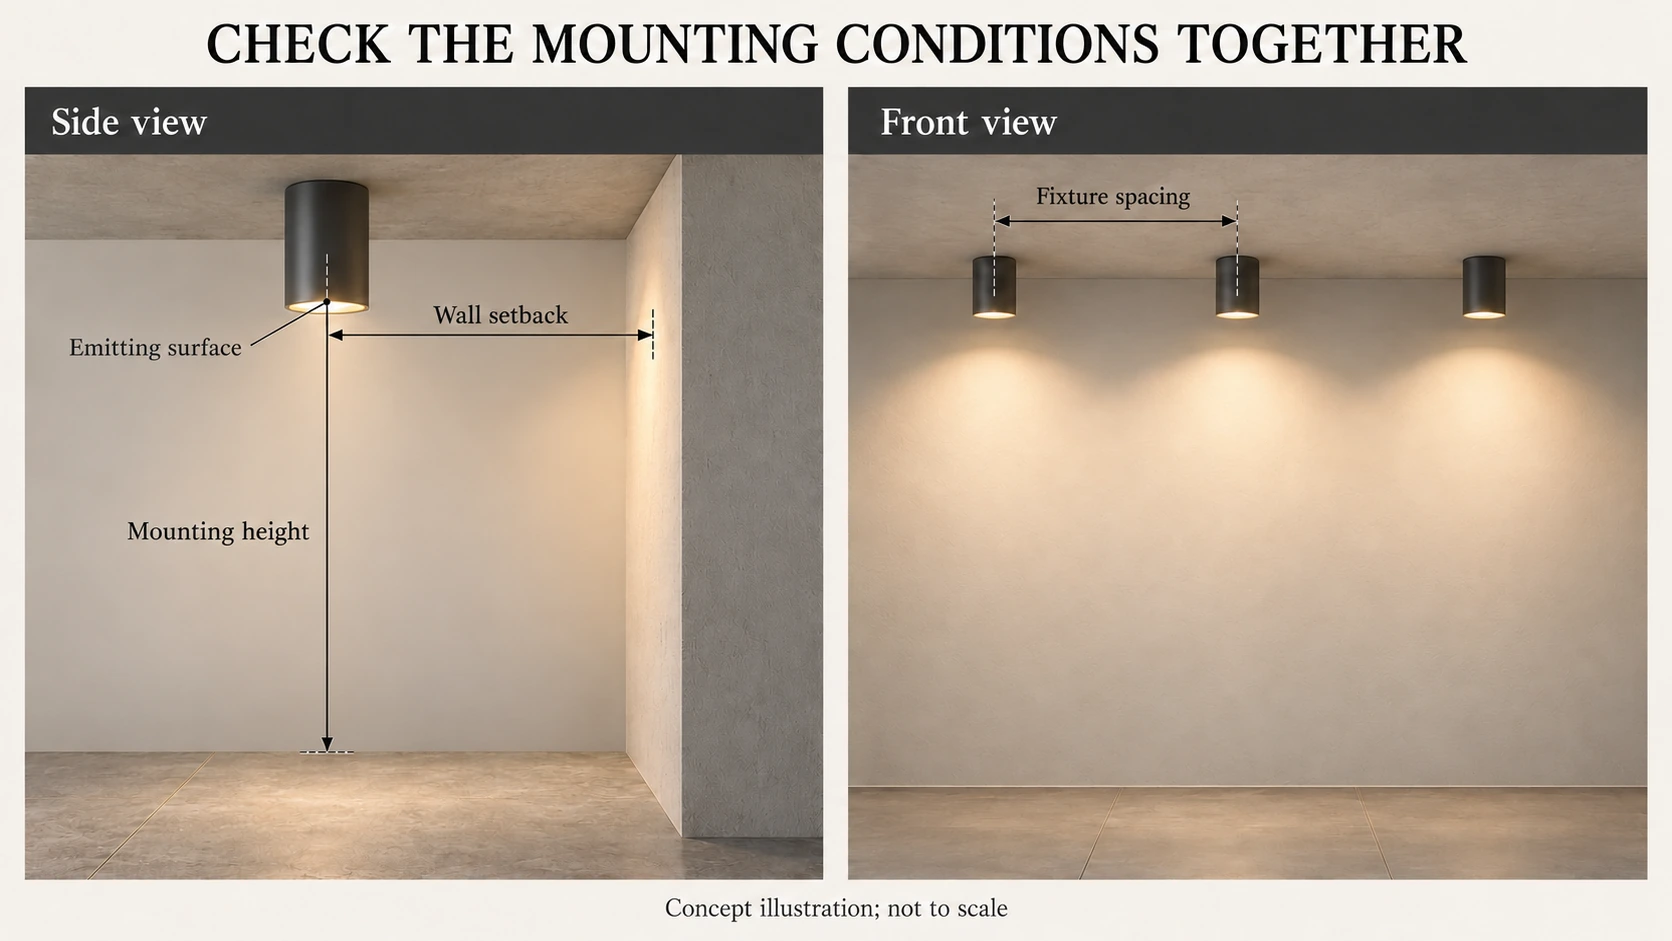
3. Review height, wall setback and fixture spacing on the same drawing
Before arranging fixtures, mark the wall area to be illuminated on plans, elevations and sections. The effective display area may cover only part of the wall, or extend toward the ceiling or floor.
Review at least these conditions:
- Mounting height and target area. Record the emitting surface's height relative to the wall area, and structures that may obstruct light at the top or bottom.
- Wall setback. Specify the finished wall surface used as the reference and record the position of the fixture's emitting surface.
- Fixture spacing and end positions. Check how adjacent beams meet, and how the first and last fixtures relate to wall ends and corners.
- Aiming and optical orientation. Mark the actual fixture direction. For asymmetric distributions, also confirm the orientation of the optical component.
- Display and structural obstructions. Include shelves, plinths, ceiling edges, brand lettering and decorative elements, checking where they may cast shadows.
Wall setback affects the lighting geometry, but it should be considered together with the distribution and target area. Some dedicated wall-washing optics are intended for relatively close mounting positions, as illustrated by LEDiL's close-mounted wall-washing optical example. Distance alone therefore does not classify an arrangement as grazing or establish whether it can produce the required uniformity.
Use information for the corresponding model to review setback, spacing and optical configuration, then confirm the arrangement against the actual wall. Our beam angle and mounting distance article provides background on initial coverage planning.
4. Compare distributions against the wall objective, then adjust positions
Fixture shape, power or one nominal beam angle does not fully describe the effect on a wall. Review photometric information for the selected configuration and its performance under comparable wall heights and mounting conditions.
For washing, the priorities are the required vertical coverage and lateral transitions. Dedicated optics can distribute light for vertical illumination. For example, iGuzzini's wall-lighting optical description describes an optical system designed for a wall-washing effect. Such information applies to a particular configuration; review the distribution of the fixture actually selected for the project.
For grazing, compare the principal texture direction, shadow length and the visibility of light and dark details. With both continuous linear arrangements and separate fixtures, review the emitting units, joins and actual wall effect to confirm the intended result.
| What you observe in the mockup | What to check first | What to observe while adjusting |
|---|---|---|
| The upper wall is noticeably bright while the lower area lacks the required light | Distribution, mounting height, setback and effective coverage | Changes at the top, bottom and adjacent areas |
| Noticeable bands or dark areas appear between beams | Fixture spacing, optical orientation and lateral coverage | Whether new issues appear at joints, ends or corners |
| Deep shadows obscure texture details | Light direction, surface relief and the contribution of other light sources | Whether the required texture remains visible as shadows become less pronounced |
| Joints or local irregularities are too prominent | The completed surface, light direction and fixture positions | Whether changes suit the intended material effect and construction conditions |
| Wall lighting draws attention away from merchandise | The wall-to-product brightness relationship, local bright patches and reflections | Whether product fronts, labels and materials remain clear |
Change one main condition at a time and record the difference. First inspect the wall itself, then restore accent lighting, ambient lighting and illuminated signage to normal operation and review the complete display hierarchy.
5. Check the mockup from the entrance, aisle and close-view positions
Inspect wall lighting from the front and along customers' normal approach routes. Fixture visibility, reflections and detail shadows can change as the viewer moves closer.
We recommend this sequence:
- Review the overall view. From the entrance or main aisle, compare the wall with the display focus and confirm that the first impression matches the design intent.
- Inspect coverage. Check the upper, middle and lower wall, areas between fixtures and both wall ends. Record the light and dark variations that need adjustment.
- Inspect materials closely. Review texture, joints, brand lettering and representative merchandise, noting how shadows and reflections affect details.
- Move along the route. Compare front and angled views, checking directly visible emitting surfaces and reflections formed by glossy materials.
- Restore normal lighting. Switch on ambient lighting, product accents and signage. Where daylight has a noticeable influence, include representative times of day.
When recording photographs, keep viewing position, exposure and white balance as consistent as possible so that automatic camera adjustments do not distort the comparison. Where a project has specific measurement requirements, measure at the agreed positions and record the results with the on-site visual assessment.
Include shelves, cases and replaceable props where they stand in front of the wall. An arrangement that looks suitable on an empty surface still needs a review for obstructions and cast shadows after merchandising is complete.
6. Give the lighting supply team a clear wall-lighting objective
Explain the wall's role, then provide drawings and material information. This helps the supply team identify the distributions, structures and mounting positions to compare.
We recommend preparing:
- Wall height, length and the effective area to be illuminated.
- Material, surface treatment and texture direction, with photographs or samples that include joints.
- Available mounting positions, wall setback space and structures that may obstruct light.
- The intended overall effect and textures to emphasize or make less prominent.
- Dimensions and positions of merchandise, lettering, plinths and shelving.
- Main customer viewing routes and other lighting used during normal operation.
- Existing fixture configurations, photometric information and mockup observations.
For the wall's role within a broader scheme, see our architectural and display lighting guide.
SEEPOSH can discuss lighting configurations and customization requirements based on the project objective, mounting conditions and materials. Specific structures, distributions and adjustment capabilities depend on the selected model, confirmed drawings and sample. Share wall and display information through our customization process or contact page.
Domande frequenti
Does wall washing always require linear fixtures?
Start with the required coverage and distribution. Both linear arrangements and separate fixtures need a review of the wall effect for the corresponding configuration. Fixture form alone does not establish vertical uniformity or lateral transitions.
Does every textured wall need grazing light?
Define the texture's role in the display. If relief should be prominent, compare a grazing effect. If the wall mainly serves as a background, also consider relatively uniform illumination. Confirm the result with the merchandise and other lighting in place.
What wall setback and fixture spacing should I use?
Determine them from the selected distribution, mounting height, effective wall area and material. Recommended conditions in product information apply to the corresponding configuration. Map them onto project drawings, then check coverage, transitions and edges in a wall mockup.
Will a brighter wall improve the display?
Review the relationship between the wall and merchandise. Increasing wall illumination can change the visual distinction between product and background, or make local reflections more noticeable. Compare settings under normal operating lighting and confirm that customers can identify the display focus and product details.


