

A single showcase might hold a full row of watches and one hero piece worth putting on a pedestal. Continuous linear light keeps the whole row easy to see, but it doesn’t necessarily draw attention to the featured position. A single spotlight creates that focal point, but the surrounding pieces and price tags can slip into shadow. Sometimes what a showcase actually needs is two kinds of light doing two different jobs: linear light holds the full display together, and accent light directs the eye to one specific piece.
Our CAI series is built mainly around linear lighting, and a few configurations combine linear and accent light in a single fixture body. Which showcases suit that kind of structure, and what should you check before specifying it? This article uses SP-22713 and SP-25057 as examples, working from the product, the cabinet, and the customer’s sightline. These are two specific configurations — not every CAI linear fixture includes accent light.
Give the Two Kinds of Light Separate Jobs Before You Pick a Model
Linear light typically runs along the top or side of a showcase, providing continuous illumination for a row of items, a shelf, or the cabinet’s back panel. It keeps the whole display visible and helps customers read the relationship between adjacent pieces. But “the whole row is lit” doesn’t mean every item needs to stand out equally.
Accent light is what draws a customer’s eye to one specific watch, ring, or other featured piece first. The position and direction of the beam need to match where that piece actually sits — and if the piece moves, the light needs room to adjust with it. An accent beam that’s too tightly focused can leave a harsh hot spot on the product; aimed toward the front glass, it can put a reflection of the light source in the customer’s line of sight before the product itself.
So before deciding whether you need a combined fixture, sketch a simple layout first: which positions need continuous, balanced light? Which one or two pieces need to be singled out? Will the featured piece change position often? Combining both tasks into one fixture body is only worth evaluating when they both land on the same mounting edge of the cabinet.
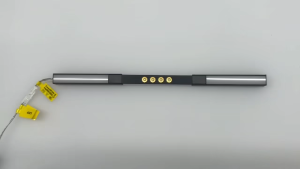
Two CAI Combination Fixtures, Two Different Priorities
| Example | Confirmed structure and function | Key design questions |
| SP-22713 | Linear light combined with a center spotlight; body length can be customized; the center spotlight rotates to adjust beam direction | Does the featured piece sit where the spotlight can reach it? Does adjusting the angle create a new reflection in the glass? |
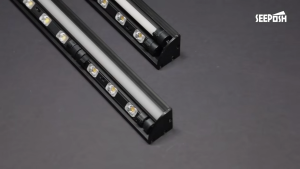
| SP-25057 | Corner fixture; three accent points on top with an independent switch; continuous linear light below; magnetic or snap-fit mounting | Is there enough space at the cabinet corner? Do the upper and lower light types read as coherent from the customer’s viewpoint? How is mounting and servicing arranged? |
SP-22713’s defining feature is an adjustable-angle spotlight built into the middle of a linear run. For showcases where the featured position is relatively fixed, it lets you keep the baseline row lighting while directing light toward the center piece. A customizable body length doesn’t mean it fits every cabinet automatically — the spotlight’s position, the cabinet’s mounting edge, the wiring exit, and the available adjustment space still need to be confirmed together.
SP-25057 takes a different approach: three accent points and a continuous linear run sit in different positions on a corner-shaped fixture body. The body measures 23.5 mm wide by 20.5 mm high, with magnetic or snap-fit mounting; the three accent points on top have an independent switch. When specifying it, you’ll also need to confirm the fixture’s position and the direction of both light types against the cabinet’s actual mounting space and power supply.
Top or Side Mounting: Judge It Together with the Product and the Glass
Fixtures like these are typically mounted at the top or side of a showcase. With top mounting, check first whether the linear light covers the full row of items, then adjust the accent light so it lands on the target piece. With side mounting, watch whether the side closer to the fixture becomes too bright while the other side, or the area behind the product, falls into shadow. Neither position should be judged from a rendering of the fixture alone — the cabinet’s glass, finish, and products all need to be checked together.
Stand where a customer would actually look from. A fixture that’s well hidden inside the cabinet can still show up as a continuous bright line or a row of bright points reflected in the front glass. SP-22713’s rotating center spotlight is meant to let you redirect the accent for different products — but every time the angle changes, check again whether it’s now hitting the glass or a customer’s sightline. SP-25057’s corner structure should be checked against the cabinet frame for visibility, obstruction, and mounting position.
Mounting position also affects what happens later: can staff adjust the adjustable parts without dismantling the cabinet? How will the fixture, wiring, and power supply be serviced down the line? These questions should be settled with the showcase manufacturer and the electrical installer before the cabinet is cut — the actual fixing and wiring details still follow the specification sheet for the chosen model.
When Is It Better to Install the Two Light Types Separately?
A combined fixture earns its place when the two light types’ tasks and positions genuinely suit sharing one mounting zone. If a cabinet just needs even illumination with no fixed focal point, a standard linear fixture may already be enough. If the featured product moves around the cabinet significantly and the accent light needs to follow it, separate fixtures — or a fixture with more positional flexibility — are worth comparing too.
There’s another case worth naming: the linear light’s best mounting position is at the top of the cabinet, but the accent light has to come from the side to avoid a glass reflection. In that situation, forcing both into one fixture body just to use a single unit — at the cost of pulling one of the beams off target — may not be worth it. The choice between a combined or a separate setup should come from product position, available mounting edges, customer sightlines, and future adjustment needs together — not from comparing fixture count alone.
For a broader comparison of fixture types across an entire showcase, see SEEPOSH’s jewelry showcase lighting specification checklist. If the cabinet is especially narrow and the priority is a more concealed fixture head, see the article on mini spotlights for narrow display cases. This article focuses only on how continuous and accent light work together within a single fixture body.
Five Things to Check in a Mockup Cabinet
Before choosing SP-22713, SP-25057, or another combined configuration, build a mockup using a cabinet, glass, and representative products close to final dimensions. When checking it, don’t just switch on one section of light and take a single photo from the front — look at the linear light, the accent light, and both running together.
- Is the full row legible? Does the linear light cover the products and labels that need to be shown? Do the edges and the center look consistent with each other?
- Is the accent accurate? Does the spotlight land on the target product rather than the glass, the back panel, or a neighboring piece? Does it still work if the product’s position changes?
- Do the two light types coexist? Is the accent distinct enough while the surrounding products stay visible?
- Does the light source draw attention to itself? From the front and from the side, is the fixture body, the hot spot, or a glass reflection more noticeable than the product?
- Is it workable to operate and maintain? Confirm switches, adjustable parts, mounting method, wiring exit, and service access against the specification for the model you’ve actually chosen — don’t assume one product’s features for another.
Photos of the mockup are useful for recording what was discussed, but automatic exposure settings change the apparent contrast between bright and dark areas. The final call on the balance between the two light types should be made under the glass and ambient light you’ll actually use, with design, merchandising, and shopfitting people looking at it together.
What to Provide When You Talk to SEEPOSH About Combined Showcase Lighting
You don’t need a model number decided before the first conversation. Please provide the cabinet’s front and section drawings, the mounting space available at the top and sides, the glass and interior finishes, a layout of where products will sit, and which items need to be singled out. If the display changes regularly, also note how much the featured position is likely to move. If you already have requirements for power supply, switching, or dimming, mark those on the drawings too.
From there we can discuss a standard linear fixture, SP-22713, SP-25057, or another suitable configuration, and identify which aspects need to be verified in a mockup. You can start with our customization process, or send drawings and reference photos through the contact page.
Domande frequenti
Does every CAI series linear fixture include accent light?
No. The CAI series is mainly linear lighting. SP-22713 and SP-25057 are specific examples that combine continuous linear light with accent light. Whether a given model has a spotlight, an independent switch, or an adjustable angle should be confirmed for the specific model you’re specifying.
If I already have accent light, do I still need linear light?
It depends on the display’s task. If you need the full row of products and labels to stay legible while also featuring one hero piece, the two light types can each handle a separate job. If you only need one of those effects, there’s no need to combine them just for the sake of it.
Can SP-22713 and SP-25057 be installed the same way?
No — the two have different structures. SP-25057 supports magnetic or snap-fit mounting; SP-22713’s fixing and wiring method depends on the cabinet structure and the corresponding installation requirements for that model.


