

Choosing an accent lighting beam angle is often an early decision when lighting a watch, a handbag or a group of products. Yet the same fixture can illuminate a noticeably different area when its distance from the merchandise changes. Raising a product stand, moving a tray or redirecting the fixture can also move the light away from the intended focal point.
Beam angle needs to be considered alongside fixture-to-target distance, target dimensions and aiming direction. The practical questions are specific: which surface should customers see clearly, can the light reach that surface, and what happens to the surrounding display?
Beam angle needs to be considered alongside fixture-to-target distance, target dimensions and aiming direction. The practical questions are specific: which surface should customers see clearly, can the light reach that surface, and what happens to the surrounding display?
When we discuss retail accent lighting with clients, we first establish these relationships in drawings or a mockup, then compare the optical configurations of particular fixtures. This gives beam angle a clear role in selection, installation and adjustment.
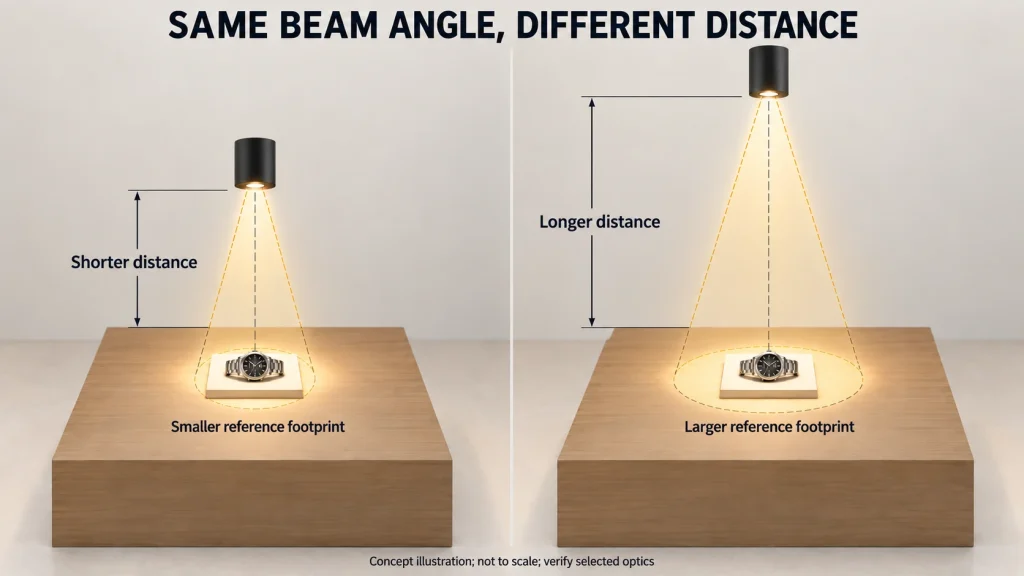
1. Identify the target surface and measure the relevant distance
A product’s overall dimensions are only a starting point. For a handbag standing on a display plinth, the important surfaces may be its leather front, hardware and outline. For a watch on an inclined stand, they may be the dial, case and strap. Lighting the display base does not necessarily make these surfaces easy to see.
We recommend marking four types of information on plan and section drawings:
- Target surface and dimensions: Which part of the product needs emphasis? Is the target one item or a group? Do price cards, trays and props also need light?
- Product height and position: Are products placed on stands of different heights? How far might they move when the display changes?
- Fixture position and aiming direction: Where can the fixture be mounted, where can it be aimed, and could a cabinet frame or shelf obstruct the light?
- Main viewing positions: Do customers look from the front, side or above? Where is it most important to see fine details?
Measure the distance to the surface that needs illumination. Ceiling-to-floor height, fixture-to-counter height and fixture-to-product distance may all be different.
For example, when a spotlight sits near the top of a showcase and a product is raised on a stand, the fixture-to-product distance is shorter than the fixture-to-cabinet-base distance. Selecting a beam angle from the overall cabinet height alone may leave too small an illuminated area at the product’s position.
For the role of accent lighting within an overall scheme, see our architectural and art display lighting guide. This article focuses on getting light onto a defined target.
2. Compare beam angle and distance to estimate coverage
Beam angle describes how widely light spreads. In the IES definition of beam angle, the angle is evaluated in a plane containing the nominal beam centerline. Its boundaries follow directions where luminous intensity is half the maximum. That 50% refers to luminous intensity; it does not directly describe illuminance or perceived brightness on the merchandise.
A stated beam angle therefore does not mark an area that is uniformly lit inside and completely dark outside. The central distribution, transition at the edges and light beyond those boundaries depend on the particular optics.
For an approximately circular, rotationally symmetrical beam falling onto a plane perpendicular to its centerline, a simple geometric relationship provides an initial diameter estimate:
D ≈ 2 × L × tan(θ / 2)
Here, D is the geometric diameter estimated from the beam angle, L is the distance from the fixture’s light-emitting position along the beam centerline to the target plane, and θ is the full beam angle. Use the same length unit for D and L.
The following hypothetical calculations illustrate the relationship between angle and distance.
| Assumed beam angle | Distance along the beam centerline to the target | Estimated geometric diameter |
| 20° | 0.5 m | Approximately 17.6 cm |
| 20° | 1.0 m | Approximately 35.3 cm |
| 40° | 0.5 m | Approximately 36.4 cm |
| 40° | 1.0 m | Approximately 72.8 cm |
Under these conditions, doubling the distance doubles the estimated diameter at the same beam angle. This helps with an initial comparison: will the beam concentrate on part of the product, or extend across the product and surrounding background?
Suppose a flat target is about 30 cm wide and the fixture is 0.5 m away. A 20° beam gives a geometric diameter of about 17.6 cm. That is a reason to check both sides of the target before selecting the optics solely for the emphasis of a narrow beam.
These diameters are for initial geometric comparisons. They do not establish sufficient illuminance, uniformity or the full visible extent of a light patch. For elliptical, asymmetrical or diffused distributions, use the corresponding photometric information. Close mounting distances also require a check of the actual light pattern.
3. Recheck the pattern when aiming at an angle
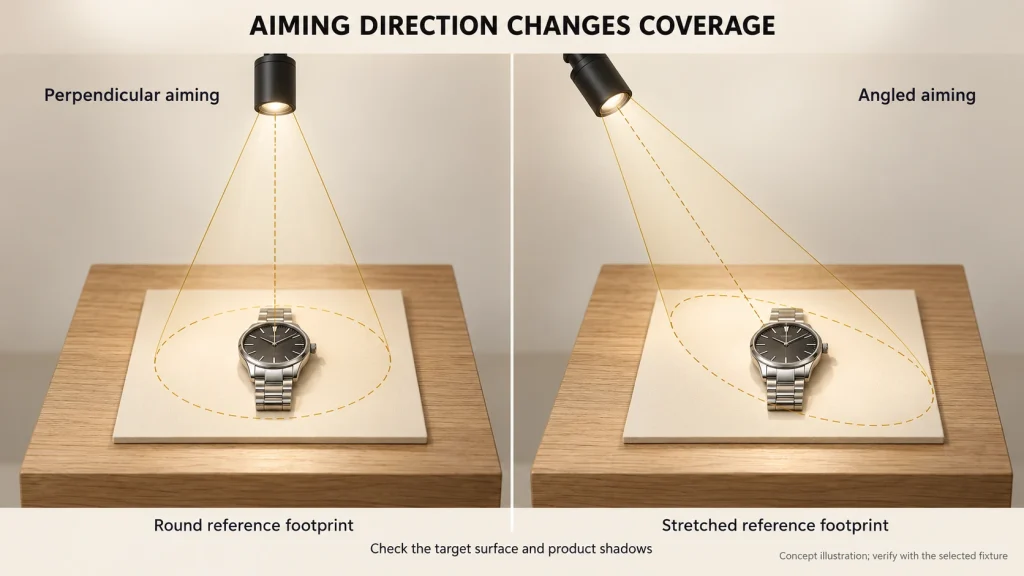
Retail fixtures often need to illuminate merchandise from above and in front, or from above and to one side. This can help light the surface customers see, while changing the relationship between the beam and the target plane.
When a beam reaches a plane at an angle, its footprint may stretch in one direction, and illuminance may differ between the nearer and farther areas. The circular diameter estimate above cannot be used directly as the complete coverage dimensions in this situation.
Consider a handbag standing upright. Light directed straight down may illuminate the handle and top first, while leaving the front relatively dark. Redirecting the fixture toward the front may improve placement, but the handle’s shadow, the side edges and reflections on the hardware still need attention.
When adjusting the fixture, check these points in sequence:
- Does the beam center land on the surface that needs emphasis, rather than on an empty base or the background?
- Are important edges and details visible, or does the product itself or a display prop obstruct the light?
- Can customers see a bright light source directly from the main viewing positions? Do reflections in glass or on the product obscure details?
For merchandise inside a glass showcase, check the final arrangement with the glass and cabinet frame in place. Viewing positions and reflected images of fixtures can affect the result, so an open-cabinet inspection alone is insufficient.
Also distinguish between two adjustments: rotating a fixture changes its aiming direction; changing its beam angle generally involves a different optical configuration. Confirm whether a particular model supports interchangeable optics or a zoom function during selection.
4. Check product edges, spill and neighboring beams
A concentrated light patch is only part of the assessment. We recommend looking within the target, around it and across neighboring products.
Start with the product itself. A bright center with dark edges may relate to coverage dimensions, distribution, aiming direction or obstruction. Increasing output alone generally will not correct light that lands in the wrong place.
Next, look at the surrounding background. Some light on a base or backboard may be intentional. If an empty background draws more attention than the merchandise, compare fixture position, aiming and optics again. A gentle transition around the product and a conspicuous background patch need different consideration.
Finally, inspect neighboring beams. Two footprints meeting does not establish an evenly lit display. Their overlap may create a bright band, while the area between them may remain dark. Product height, orientation and surface materials also affect the final appearance.
| What you see in the mockup | What to check first | Adjustments to compare |
| A bright center with important details dark at the sides | Target dimensions, actual distance, distribution and obstructions | Compare other optics or fixture positions, then recheck the product edges |
| A patch on the base or backboard draws more attention than the product | Beam center, coverage dimensions and background material | Adjust aiming or position and compare a distribution better suited to the target |
| A bright band or dark gap appears between products | The aiming positions and overlap of neighboring beams | Adjust fixture positions, directions or individual output settings, then review the whole group |
| The top is clear but the front remains dark | Target surface, light direction and obstruction by the product itself | Compare illumination from above and in front or from the side, checking reflections and shadows |
| The original lighting no longer works after changing a stand | Product height, position and fixture-to-target distance | Re-aim for the new arrangement and review the required coverage |
When every item in a row relies on a separate light patch for basic visibility, display changes may require frequent adjustment. A broader base layer combined with accents is another arrangement to discuss and test. Our article on focused and diffused optics for Ling Series gantry lights explores optical directions for these display goals.
5. Compare options with the actual display
After reviewing dimensions and initial geometry, confirm the selected fixture under representative conditions. Use merchandise, stands, background finishes and glass that are close to the final arrangement. Include taller, lower, darker and reflective items.
When comparing two optical configurations, keep fixture position, target distance, product layout and surrounding illumination as consistent as possible. When comparing mounting positions, first keep the optics fixed. Changing one condition at a time makes the cause of a difference easier to identify. Record the output settings for each option as well.
Start with one accent fixture on its own. Check which surface it reaches, how its edges transition and where bright patches appear around the target. Then add neighboring fixtures to review overlap. Finally, switch on the surrounding lighting used in the finished space and confirm that the merchandise remains clear within the overall scene.
For photographic comparisons, keep camera position, exposure and white balance as consistent as possible. Automatic adjustments can make two options appear equally bright. Use photographs to record differences and inspect the display in person from the main customer viewing positions.
Where photometric files or illuminance information are available, check the model, optics, mounting distance and calculation conditions. If coverage or uniformity needs confirmation, record illuminance at the center and edges of the target surface and at neighboring product positions. Assess those readings alongside the materials and the appearance seen on site.
After reviewing the mockup, record the fixture model, optics, mounting position, target distance, aiming direction, output settings and merchandise and stand positions. These details are more useful than a beam angle alone when changing the display or reinstalling fixtures.
6. Give the supply team the target and installation conditions
Requesting a narrow-beam spotlight does not fully define the intended result. For a retail display project, we recommend supplying:
- Plan, elevation and section drawings with showcase or display-area dimensions.
- Available fixture positions and distances to the main target surfaces.
- Product dimensions, height relationships and the surfaces to emphasize, with representative photographs.
- Information about stands, shelves, glass, cabinet frames and background materials.
- Main customer viewing positions and whether the merchandise arrangement changes frequently.
This information helps us discuss fixture structure, optics and the required adjustment range, then identify the samples to compare. For watch displays, our watch showcase spotlight selection article provides related application context. Review candidate beam angles against the actual dimensions and installation conditions.
SEEPOSH can discuss custom lighting solutions for project requirements. Specific dimensions, optical options and adjustment capabilities depend on the selected model, confirmed drawings and sample. With your display and merchandise information ready, explore our lighting customization process or contact us to define where the accent light needs to land and the effect it should achieve.
Domande frequenti
Does the same beam angle give the same coverage at different mounting heights?
Usually it does not. Compare the actual distance from the fixture to the target surface, rather than mounting height alone. In the simplified case of a circular, symmetrical beam meeting a perpendicular target plane, the estimated diameter increases with distance. Recheck coverage when product height or aiming direction changes.
Will a wider beam make a whole group of products evenly bright?
A wider beam may increase the illuminated area, but the group effect also depends on distribution, distance, neighboring beam overlap, product heights and materials. A larger footprint does not directly mean equal illuminance or perceived brightness across the merchandise. Compare options in the actual arrangement.
Does a rotatable spotlight also have an adjustable beam angle?
Rotation generally changes aiming direction. Whether beam angle can be adjusted, optics can be exchanged and particular options are available depends on the model. State the required aiming range and optical coverage separately during selection.


