

“We need high-CRI lighting for a display case. Please quote as soon as possible.” That message can start a conversation, but it leaves too much open to interpretation. One quotation may include drivers and mounting accessories; another may cover the fixtures alone. Both may appear to meet the brief, even though the proposed systems and delivery scopes are different.
For a jewelry showcase, cosmetics display, bag wall or illuminated sign, a useful request for quotation (RFQ) does more than list fixture specifications. It brings together the display task, installation limits, power and control requirements, and approval method. This custom retail lighting RFQ checklist helps designers, shopfitters and procurement teams prepare that information before requesting a proposal.
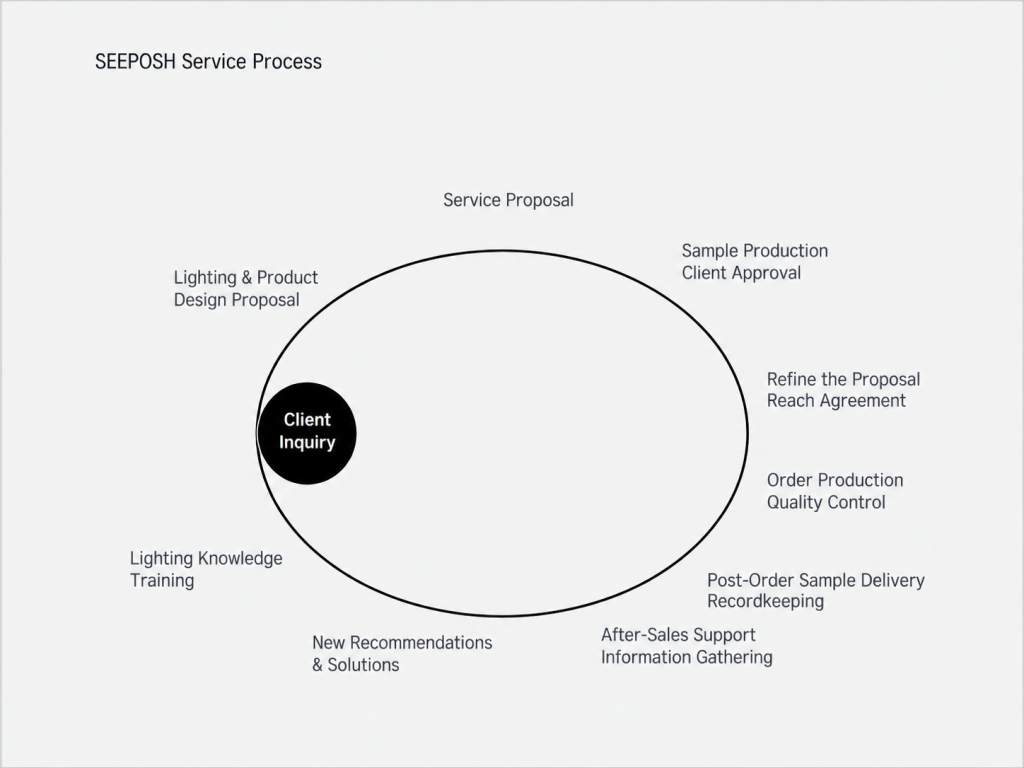
In SEEPOSH’s service flow, an inquiry leads to a lighting and product design proposal, followed by a service proposal and a sample for customer review. A clear RFQ belongs at the start of that process. It gives both sides a shared brief before they commit to a design or sample.
1. Describe the Display Problem Before Naming a Fixture
Start with what the light must do. A jewelry case may need to bring out one piece without reflecting a visible lamp head in the glass. A bag cabinet may need light to reach the lower front of a tall bag. An illuminated shelf may be judged mainly by the appearance of the entire glowing surface. Each task points to different fixture positions, optics and sample checks.
Mark each requirement as essential, an option to compare, or still to be decided. If the color temperature or control method is undecided, say that it will be confirmed with a sample instead of entering an arbitrary number. Explain whether the merchandise layout will change and where customers will normally view the display.
If you are still comparing spotlights, stem lights, linear lights and light guide panels, see our jewelry showcase lighting checklist. This guide focuses on the next task: communicating the project conditions to a supplier and keeping a record of what has been agreed.
2. Send Drawings Together with the Conditions They Cannot Show
Provide a plan, elevation and section for the areas that need lighting. Mark clear internal dimensions, possible mounting surfaces, glass, finishes, merchandise positions and space reserved for electrical components. Concept drawings are enough to begin a discussion if the project is still developing, but identify dimensions that may change. The final configuration should refer to an approved drawing revision.
Add information that may be missing from the drawings:
- Site or mockup photographs: Show the actual cabinet depth, shelves, reflective materials and any structure that could block the light.
- Representative merchandise and sightlines: Describe product dimensions, materials and likely positions. Mark the front, side or overhead views that matter to customers.
- Known problems or a target appearance: Identify where dark areas, visible LED dots, glass reflections or product shadows appear. Label reference images as inspiration or as a result the sample must match.
This also exposes a common gap: a drawing may leave room for the fixture body while overlooking the clips, cables, driver or future service access.
3. Make the Lighting Result Testable on a Sample
Terms such as “uniform,” “comfortable” and “accurate color” are useful starting points. Add what will be inspected, from where, and under which conditions. For a light panel, check the emitting surface and its edges. For a linear light, check the ends and joints. For a glass showcase, inspect reflections from the positions where customers will stand. A sample with representative products, glass and finishes tells you more than an empty cabinet or a fixture lit on a workbench.
If the project already has targets for correlated color temperature (CCT), color rendering index (CRI), beam distribution or illuminance, state the target, where it applies and who will approve it. If those values are not settled, describe the desired product appearance and compare options during sampling. A setting that works for one display should not automatically become a storewide requirement.
If product color or consistency across several displays is especially important, include that in the RFQ. SEEPOSH can discuss configurations with a CRI above 95 according to project needs. Whether that is available for the selected fixture, and how color consistency will be checked, should be confirmed against the exact model, sample and test information.
4. Define Power, Controls, Installation and Service Access
The quotation should cover a working lighting system, not only the visible fixture. Ask the electrical and shopfitting teams to confirm the available power supply, proposed driver location, switching or dimming needs, zones or scenes, cable routes, mounting method and access for future replacement or maintenance.
If a control system has already been selected, share the controller and driver information so compatibility can be checked. If it has not, describe the action you need—for example, independent dimming for one shelf or a shared switch-off at closing—before choosing a protocol. State the project market and any electrical or product documents the team needs. Certification and documentation must be checked for the final configuration rather than assumed from a product family name.
5. Ask the Proposal to State Its Assumptions and Scope
When quotations arrive, compare more than unit prices. Ask each supplier to identify the drawing revision and product configuration it has used, along with any assumptions that remain open. Check whether the price includes fixtures, drivers, controllers, connectors, mounting hardware and samples. Confirm whether the cabinet needs additional machining, and distinguish sample, production and shipping milestones.
If a supplier offers two options, ask how each meets the same display goal. One may prioritize hiding the fixture; another may make aiming easier when merchandise changes. Designers, buyers and installers can then compare complete approaches and their limits instead of comparing model numbers without context.
Depending on customer needs, SEEPOSH can discuss fixture selection from drawings, lighting simulations, custom solutions, dimming, fixture layout and wiring. The conditions for a complimentary sample, available test reports, on-site technical guidance and after-sales support should be stated in the project proposal or quotation. If the project seeks delivery within 7–10 working days, include that target in the RFQ so SEEPOSH can assess its feasibility for the chosen configuration, sample approval, quantity and destination.
6. Separate Pre-Order Sample Approval from Post-Order Sample Records
Inspect a sample under conditions as close to the final installation as practical. Record the fixture and driver configuration, mounting position, control setting, merchandise and finishes used, viewing angles, and any issues that still need a change. Where measurements are required, agree on what will be measured and how the results will be recorded. “Looks good” alone is difficult to use as an approval record.
SEEPOSH’s service flow has two separate sample steps. A sample is made for customer confirmation before the order. The parties then refine the solution and reach agreement before order production and quality control. After the order, the flow also includes sample delivery and recordkeeping. The first step helps approve the solution; the second concerns the post-order sample and its retained record. The RFQ can ask what documents and approvals are needed at each point.
Give approved drawings, configuration lists and photographs a revision number and date. Record what was accepted and what must change. If the fixture size, LED, driver, finish or mounting method changes before production, determine whether another review is needed. The post-order sample record should also identify the configuration it corresponds to, so later production or replenishment can be compared with the agreed version.
Copyable Retail Lighting RFQ Checklist
You do not need every answer for an initial inquiry. Mark unknown items “to be confirmed”, and note who will provide them and when.
| Item | What to provide or confirm |
| Project and contacts | Project type, market, contacts, design stage, desired sample and installation dates |
| Display task | Merchandise, frequency of display changes, main visual goal and existing problems |
| Drawing revision | Plan, elevation and section with dates; final dimensions and dimensions still subject to change |
| Cabinet and finishes | Mounting areas, glass, shelves, reflective materials, reserved space and service access |
| Viewing conditions | Main customer sightlines, representative products or material samples, reference images |
| Lighting goals | Role of ambient and accent light; CCT, CRI, beam and illuminance targets, if decided |
| Power and controls | Available supply, driver location, cable routes, switching, dimming, zones and selected control equipment |
| Installation responsibilities | Proposed mounting method; who handles cabinet cutouts, wiring and on-site adjustment |
| Required documents | Specification, installation, electrical, test or certification documents needed for the project market |
| Sample approval and records | Pre-order sample configuration, inspection conditions, approvers and change rules; version linked to post-order sample delivery and records |
| Quotation scope | Whether drivers, controllers, connectors, mounting parts, samples, shipping and on-site services are included |
Sending this table with the drawings makes it easier for a supplier to identify missing conditions and return comparable options. When the project changes, updating the RFQ and drawing revision is more reliable than reconstructing a decision from a long email thread.
SEEPOSH’s service flow also includes after-sales support and information gathering, new recommendations and solutions, and lighting knowledge training. Clear design and sample records can help everyone return to the original decisions when a display is maintained, changed or expanded.
Frequently Asked Questions
Can we request a quotation before construction drawings are complete?
Yes. Concept drawings, key dimensions and photographs can start the discussion. Mark uncertain items and ask the supplier to state the assumptions behind an initial proposal. Final details affecting cutouts, power and production should be confirmed against approved drawings and samples.
Do we still need a physical sample if the rendering looks right?
A rendering communicates design intent, but it cannot by itself confirm glass reflections, material appearance, visible joints, cable exits or maintenance access. Check important display positions with a sample or mockup that resembles the final installation.
Can we change the driver or finish after a sample is approved?
Do not assume the change is interchangeable. A different driver may affect control and dimming; a different finish changes the fixture’s appearance. Record the change and decide whether further testing or sample approval is needed.
Are complimentary samples, test reports or on-site guidance included in every project?
They can be discussed according to customer needs. Whether they are available and which project stages they cover should be set out in the agreed proposal or quotation.
To discuss custom showcase or retail display lighting, review SEEPOSH’s customization process, then contact us with your drawings, site conditions and the RFQ checklist above. We can use them to discuss suitable lighting options and the sample checks your project needs.


