

A watch may be well lit, yet customers still have to move to read its dial. In a jewelry display, bright lines in the glass can draw attention away from otherwise clear product details. These problems call for a review of the merchandise, glazing and customer's line of sight together.
Reducing glass display lighting reflections starts with understanding what customers can see from their normal viewing positions. A fixture may illuminate the target successfully while its reflected image appears in an inconvenient place.
When we discuss showcase lighting with clients, we establish the main viewing positions, identify the source of the interference, then compare fixture positions, aiming directions and available optics. The goal is to make product outlines, materials and information clear during normal viewing.
1. Identify the source: direct visibility, glass reflection or product highlight
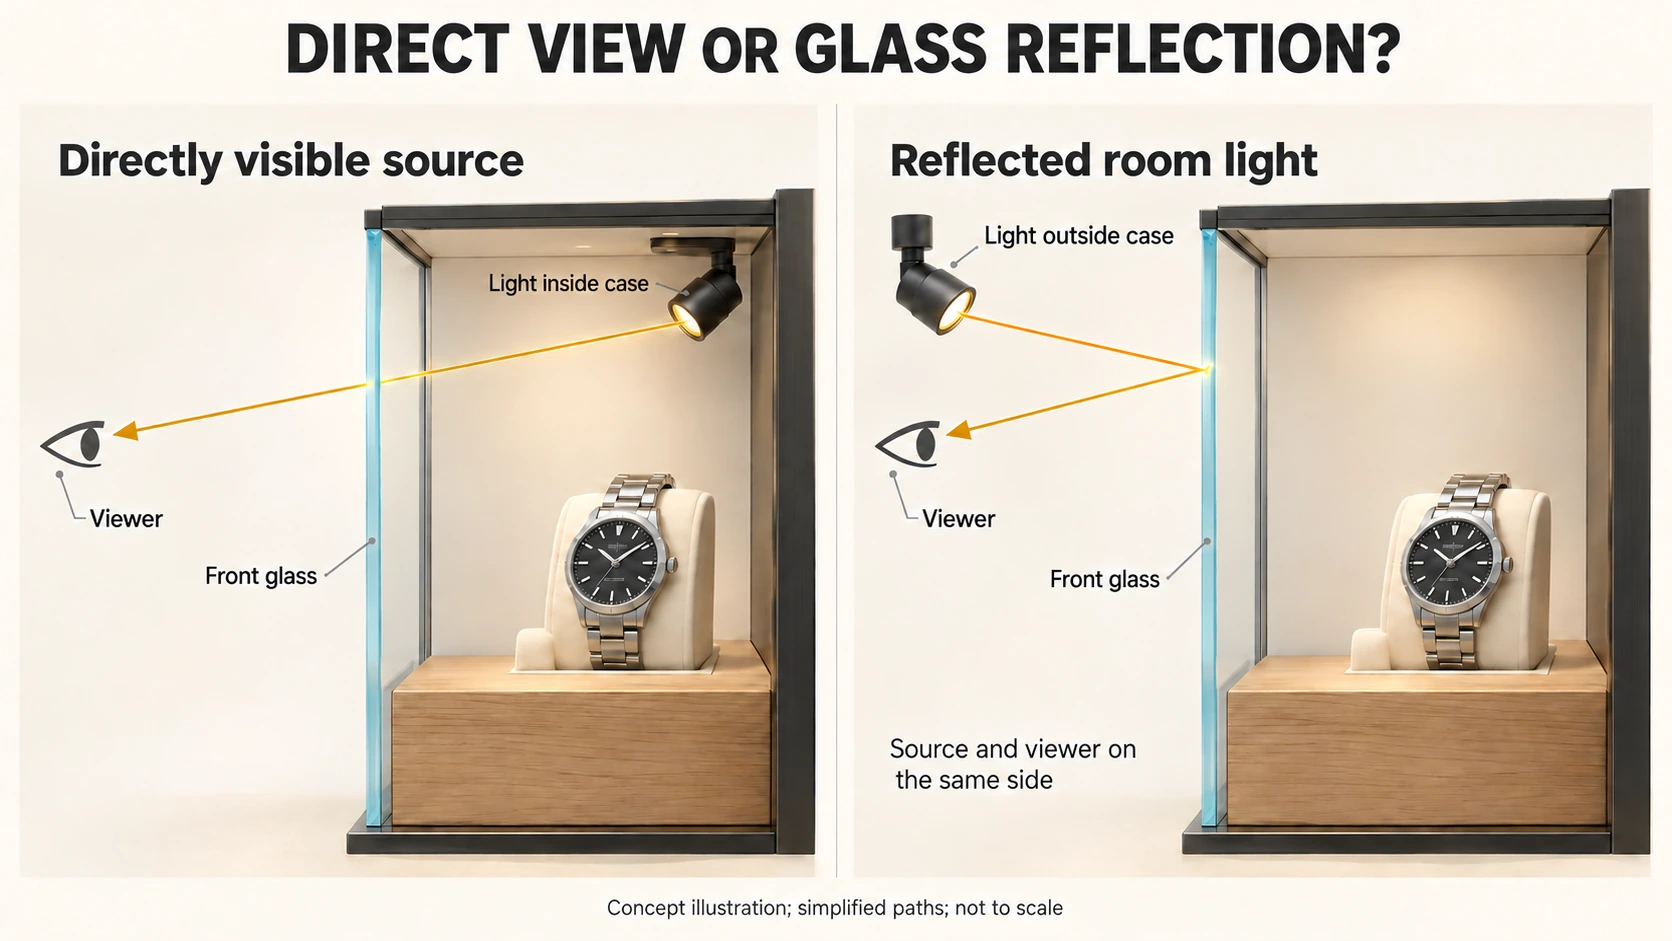
Bright points and lines seen through glass can have different origins. Seeing the emitting surface of an internal fixture directly through the front pane requires a different check from seeing a reflected image of a fixture.
Products also reflect light. Watch crystals, metal cases, polished hardware and glossy props can affect the visibility of details. Some highlights help convey a material's character; assess whether they obscure information customers need to recognize.
| What you see | Possible origin | Initial check |
|---|---|---|
| A fixture's illuminated emitting surface is visible through the glass | Direct view of the light source | Compare it with the fixture's actual position and check whether the frame or fixture structure shields the emitting surface |
| A fixture-shaped bright point or line overlaps the view of merchandise | A reflected image formed by a glass pane | Switch candidate lighting groups on and off, recording the pane and viewing position where interference appears |
| An image of a window, illuminated sign or surrounding display covers the merchandise | Reflection of the environment around the case | Check the positions of bright surfaces outside the case and compare conditions with daylight and other lighting |
| A bright patch appears on a watch crystal, metal or hardware | Reflection from the product itself | Compare product orientation and light direction, checking whether the highlight obscures details |
These effects can occur together. Keep the merchandise and viewing position fixed, then separately switch off internal accent fixtures, linear lights or relevant room lighting groups. Observe which change affects the interference. This helps identify the source; restore normal operating lighting afterward to assess the combined result.
A bright point resembling an LED is not enough to identify a glass reflection. First compare fixture positions and glass surfaces so that subsequent adjustments address the right cause.
2. Mark the viewing positions customers actually use
Reflections depend on viewing position. A case may look clear from the front while a bright line appears as customers approach along the aisle. A source that is unobtrusive when standing may become visible when sitting down to try on a product.
On plan and section drawings, mark:
- The direction from which customers approach and their usual stopping points.
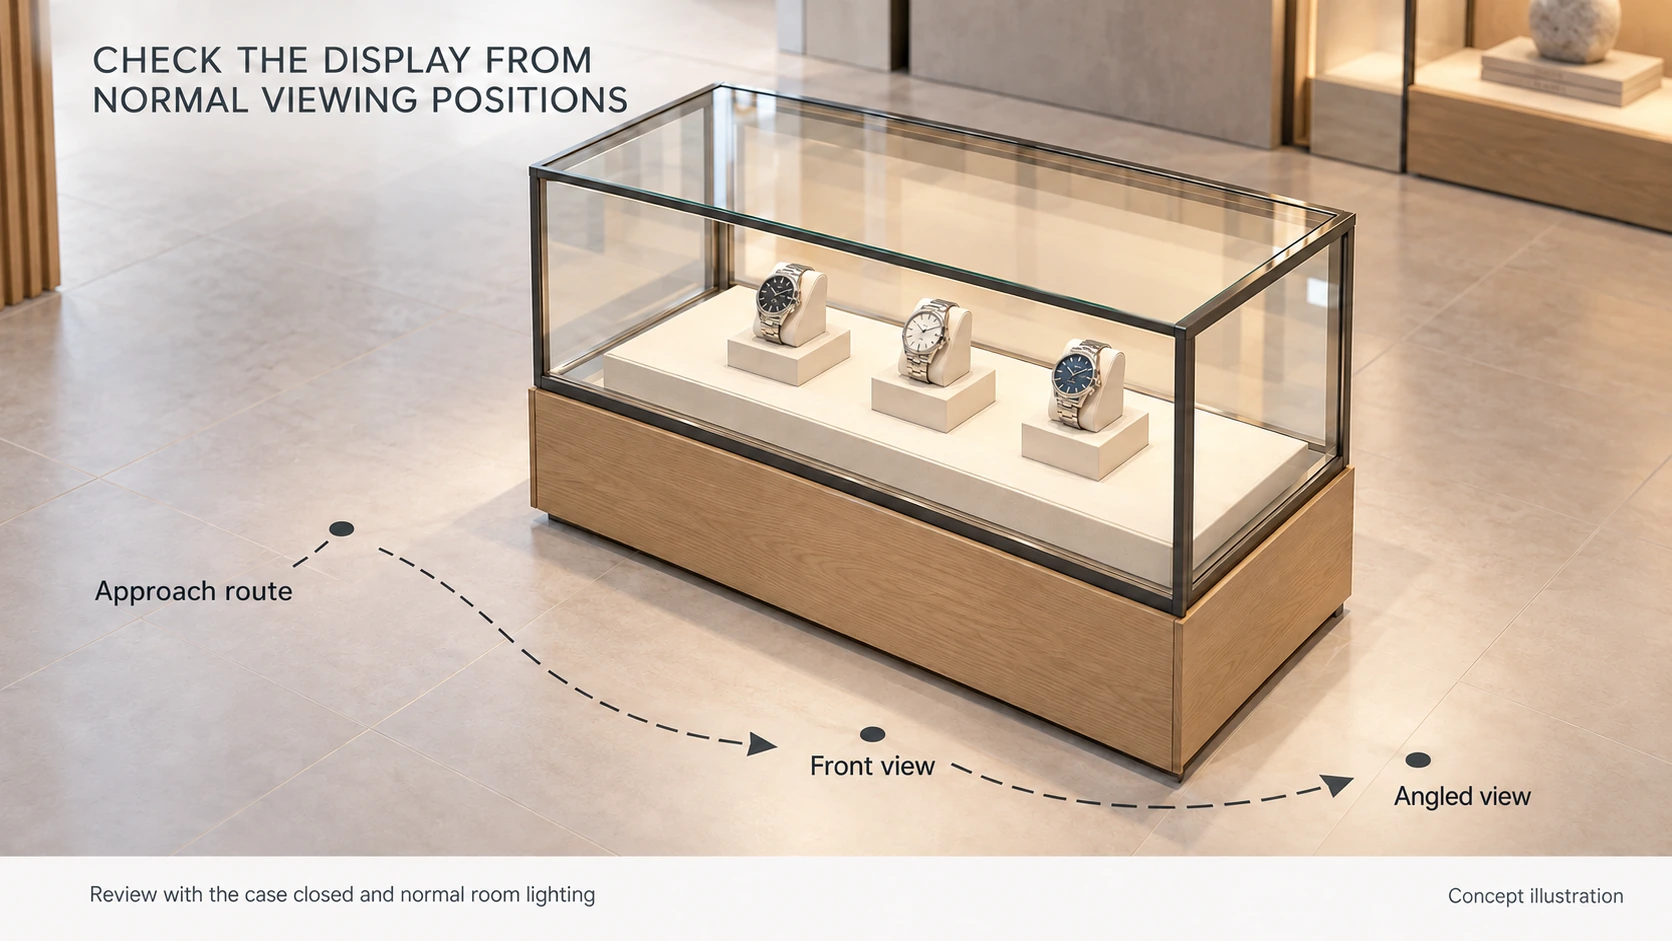
- Main front, angled and close-detail viewing positions.
- The range of eye positions used when standing, sitting or leaning forward.
- The merchandise, labels and important surfaces that should be clear from those positions.
Base these positions on the display and its normal use. A single eye height or viewing distance should not be applied to every arrangement. Counter displays, upright cases and street-facing windows have different viewing conditions.
For example, watches in the center of a case may be viewed by customers walking along the counter and by those stopping to inspect a dial. Mark the approach, front stopping point and angled close-view position, then check whether a reflection obscures the dial from any of them.
Establishing these positions gives the design, merchandising and lighting supply teams consistent conditions for comparing options.
3. Put fixture positions, glass and sightlines on the same drawing
For a flat glass surface, specular reflection can be examined geometrically. Use the perpendicular to the surface at the reflection point as the reference: incident and reflected light travel at matching angles. See the law of reflection explanation.
Mark the suspected source, corresponding glass pane, customer's eye position and target merchandise. Review the source-to-glass-to-eye path to identify whether a reflected image could overlap an important product or label.
For a single reflection from a flat pane, another initial check is to mirror the source position across the glass plane. Draw a line from the eye position toward that virtual image and locate its intersection with the glass. A real source has dimensions, so consider the image of the whole emitting surface rather than only one center point.
Identify which pane forms the reflection. Front-glass reflections seen by a customer outside the case may come from ceiling fixtures, windows or illuminated signs on the customer's side. Internal fixtures may be directly visible through the front glass, or appear reflected in rear, side or top panes. For a single specular reflection at a particular surface, the source and the eye receiving that reflection are on the same side of that reflecting surface.
Consequently, a bright line does not automatically mean an internal light is reflecting from the front pane. Identify the path before deciding whether to adjust internal lighting, the surrounding room or another glass surface in the case.
This drawing review helps identify possible problems. Both surfaces of the glass, multiple panes and other bright surfaces can produce more complex reflections. Confirm the actual image positions and intensity in a representative sample case.
4. Change one condition at a time and review the products and reflections together
After identifying the source and viewing positions, choose a priority position to improve. Keep the merchandise and surrounding illumination fixed while comparing individual adjustments.
Compare aiming directions first. Check whether important product surfaces receive the required light and whether the directly visible source or reflected image changes. Rotating a fixture may alter the light emitted toward a viewing direction and the brightness of the visible emitting surface. It does not automatically move the reflected image away from the merchandise.
Then compare mounting positions. If adjustments at the fixed position cannot meet the main viewing requirements, reconsider the fixture's relationship to the glass, products and case edges. Moving the fixture changes geometry and product coverage, so review both.
Compare shielding and optics according to the model and structure. The position of the emitting surface, shielding or compatible accessories may help limit bright light visible from certain directions. Check whether the configuration also changes product illumination, edge coverage or shadows inside the case.
If the interference comes from room fixtures, windows or illuminated signs, coordinate those surfaces and their positions with the interior design team. Assess internal fixture adjustments alongside the room lighting used during normal operation.
| What you adjust | Change to observe | What to review alongside it |
|---|---|---|
| Fixture aiming | Whether direct source visibility or the reflected image becomes less conspicuous | Clarity of product fronts, edges and labels |
| Mounting position | Whether the reflected image's overlap with merchandise changes | Actual distances, coverage, obstructions and available mounting space |
| Shielding or optical configuration | Whether bright light is controlled in the relevant viewing directions | Product illumination, shadows and accessory compatibility |
| Product or stand position and orientation | Whether product highlights or obstructions change | Detail visibility from main positions and the intended display focus |
| Room fixtures or other bright surfaces | Whether environmental reflections decrease | Suitable illumination for aisles, surrounding displays and normal store operation |
For projects using linear lights at the top of a showcase, see our Only Series rotatable linear lighting article. The featured custom configuration retains the ability to adjust the whole light body's direction after fixing. Confirm the usable range and final reflection effects with the case structure and selected configuration.
5. Close the case and inspect it along the viewing route
The sample case should closely represent the final glazing, frame, merchandise and background. Assessing the light only with the door open, or from a single front photograph, can miss interference during normal use.
Clean the glass before inspection and record the glazing specification, fixture positions, merchandise and stand locations. Close the case, then compare the result before and after adjustment from the main viewing positions.
We recommend these checks in sequence:
- Inspect the main merchandise. Are dials, textures, hardware and labels easy to recognize? Do bright lines or patches obscure important information?
- Inspect each pane. Alongside the front, review reflections visible in side, rear and top glass.
- Follow the route. Move from the approach to the close-view position, checking whether interference reappears along part of the route.
- Restore complete lighting. Switch on the lighting groups and illuminated signs used in normal operation. Where daylight varies noticeably, compare representative daytime and nighttime conditions.
- Compare alternative arrangements. Test planned product heights, stands and layouts to review the remaining adjustment flexibility.
The Canadian Conservation Institute's display lighting guidance also recommends trialing lamps under conditions close to their intended installation and inspecting glare along approach and other viewing routes, including reflections from shiny surfaces and glazing. That inspection approach can also inform a retail case review. See the CCI display lighting technical bulletin.
When recording photographs, keep camera position, exposure and white balance as consistent as possible. Record the viewing position and room lighting state as well. Photographs document differences; an on-site review confirms whether customers can see the merchandise clearly.
For cases or windows with frequently changing displays, use our lighting checks for changing retail window displays to include reflection review after each rearrangement.
6. Show the supply team where interference appears
Saying that the glass is too reflective identifies a concern, but discussing a solution needs the corresponding positions and conditions. We recommend supplying:
- Dimensioned plans, elevations and sections showing panes, frames and available mounting areas.
- Actual fixture positions, aiming directions and current adjustment ranges.
- Photographs of merchandise, stands and backgrounds, identifying the surfaces and information that need to be clear.
- Overall photographs from the main viewing positions, with troublesome bright points or lines marked.
- Positions of room fixtures, windows and illuminated signs, and the times when interference is prominent.
- The selected glazing specification or glass samples to compare in the mockup.
This information helps us discuss fixture structure, optics, mounting and adjustment capabilities separately. Assess glazing options using the corresponding supplier information and samples, together with the actual lighting.
SEEPOSH can discuss custom lighting solutions based on the display goal and case conditions. Specific capabilities depend on the selected model, confirmed drawings and sample. Explore our customization process or contact us to define the viewing positions and product details that need improvement.
FAQ
Will anti-glare fixtures or a lower-UGR scheme prevent reflections in the glass?
Review the reflected images and their overlap with merchandise separately. UGR evaluates discomfort glare in interior lighting and accounts for observer position and viewing direction. It does not, by itself, establish whether a glass reflection obscures a particular product. See CIE's explanation of interior discomfort glare.
For background on glare within a space, see our UGR and glare control article. Continue checking the showcase from the actual viewing positions.
Is there a universal fixture angle that eliminates every reflection?
Determine the angle using the glass orientation, fixture position, merchandise and eye positions. Specify which surface or direction an angle is measured against. Compare options in drawings and a sample case, record settings suitable for that arrangement, and review them after display changes.
Should internal lights be dimmed first when glass reflections are prominent?
Identify the source first. If the interference comes from bright surfaces outside the case, dimming internal lights may make the merchandise harder to recognize while the reflection remains. For interference originating from internal fixtures, compare aiming, position, optics and output settings while confirming product visibility.
Is replacing the glass with anti-reflective glazing always necessary?
First assess fixture positions, viewing positions and environmental reflections. Then compare relevant specifications and samples with the glazing supplier. Review anti-reflective materials under the final lighting, glass dimensions and viewing conditions, alongside product clarity. The CCI guidance on display glazing and anti-reflective materials provides background on material options.


