

Customers entering a store need to find their way around, recognize display areas and notice products worth a closer look. As they approach the merchandise, they also need to see materials, labels and details. Each of these viewing tasks calls for lighting with a clear purpose.
When walls, illuminated signs and every product attract equal attention, the featured display can lose its focus. When only a few products are lit, surrounding merchandise and circulation areas may become difficult to see. Balancing ambient and accent lighting means considering the space, the display priorities and the view at close range together.
At SEEPOSH, we begin retail lighting discussions by understanding the layout, merchandise and intended presentation. We then discuss fixtures, aiming and control requirements. Defining what each layer of light needs to do helps carry the design through fixture selection, installation and on-site adjustment.
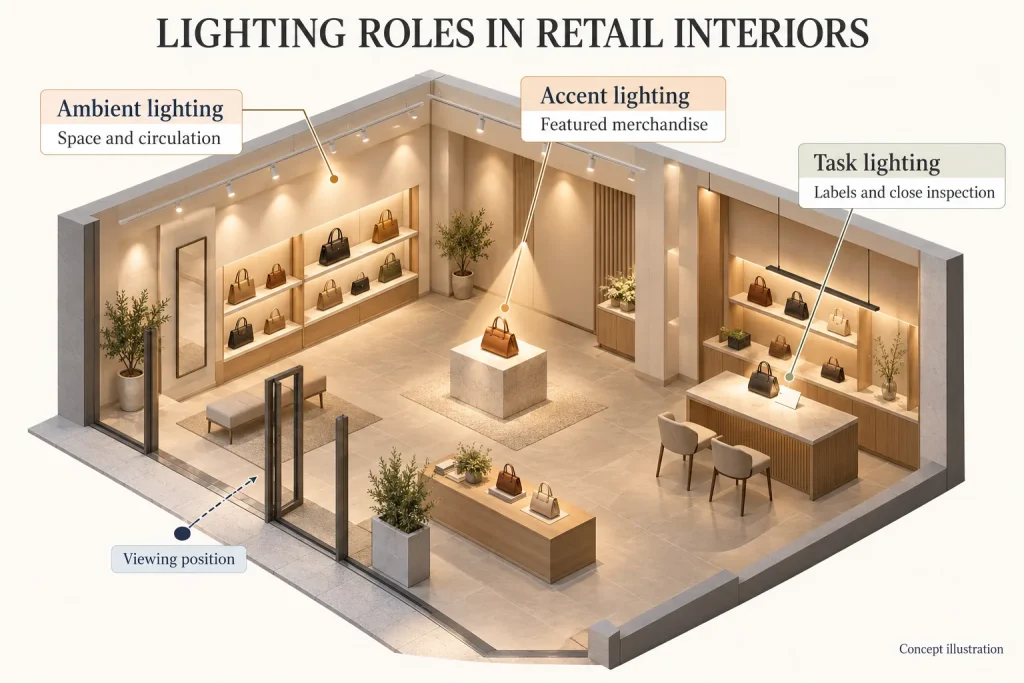
1. Give ambient, accent and task lighting clear roles
Ambient lighting provides the general illumination that helps customers understand the space, circulation routes and display areas. It can come from ceiling lighting, illuminated walls and other sources that contribute to the overall light in the room. Where daylight enters the store, include it in the viewing conditions too.
Accent lighting emphasizes selected products, exhibits or areas. Its direction also affects the appearance of product forms, textures and shadows. During design, identify the surfaces that need light and the positions from which customers will view them.
Task lighting supports activities such as reading price labels, inspecting details, trying on merchandise and using the checkout. It should work with the surrounding lighting while providing the visibility those activities require.
| Lighting role | Main purpose in a retail interior | What to check |
| Ambient lighting | Keep circulation routes, walls and display areas clear and establish the spatial background | Whether routes and surrounding displays remain visible, and whether the background attracts too much attention |
| Accent lighting | Emphasize featured merchandise or a selected display position | Whether light reaches the target and reveals the important product surfaces |
| Task lighting | Support reading, trying on merchandise, close inspection and practical activities | Whether labels, details and work areas are clear, with shadows and reflections considered |
Different fixtures can perform these roles, and their contributions may overlap within one area. A strip light, downlight or spotlight can serve different purposes depending on what it illuminates. For an overview of ambient, accent and task lighting in retail applications, see PG&E’s retail lighting guidance.
Decorative pendants, illuminated lines and backlit signs also influence the store’s overall brightness relationships. Include them when reviewing the layers of light and their effect on the merchandise focal points.
2. Start with viewing positions and display priorities
Before positioning fixtures on a plan, identify where customers will look from. Their view on entering the store may differ from the view along an aisle or when standing at a counter to examine a product.
We recommend marking three types of information on plans, elevations or site photographs:
- Main viewing positions: Entrances, aisles, positions in front of showcases and any places where customers will sit to view merchandise.
- Display priorities: Featured products, coordinated collections and brand or product information that needs to be recognized.
- Viewing conditions: Product heights, background materials, glass, props and structural elements that may obstruct light.
For example, a handbag display along a wall may need to read as a complete collection from a distance. Closer to the display, customers may need to see the front of the featured bag, its leather texture and its hardware. The lighting should address both viewing distances.
Within each area, describe what customers should notice first, what they should see next and which details they need to inspect close up. This gives design, merchandising and lighting supply teams a shared understanding of the intended focal point.
For broader architectural and display lighting principles, see our architectural lighting and art display guide. This article develops the practical process of assigning lighting roles and checking how they work together in the space.
3. Use ambient lighting to establish a clear background
Ambient lighting should help customers move through the store, recognize surrounding displays and view merchandise comfortably as they approach. Review circulation routes, walls, display backdrops and adjacent areas together when setting this layer.
Background materials affect the result. Light-colored walls, dark fabric back panels and polished stone can show different brightness and reflections under the same illumination. Use material samples close to the final specification when possible, so lighting settings can be reviewed in the intended context.
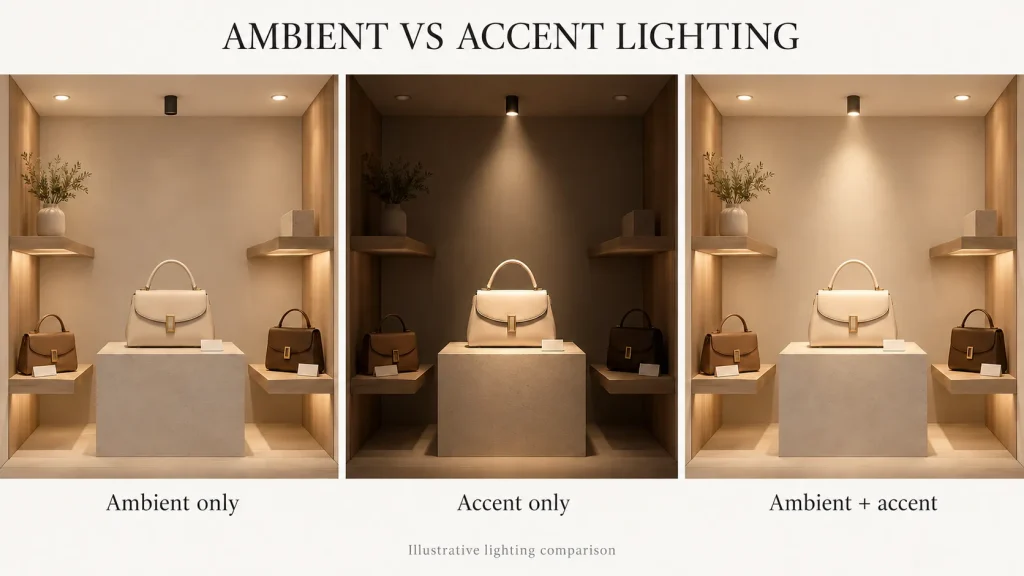
Once ambient lighting is established, add the accent lighting and check whether the featured position has a clear distinction. If the product still lacks emphasis, review nearby walls, illuminated graphics and other displays to identify anything that draws attention away from it. Then discuss adjustments to the relevant brightness settings or illuminated areas.
During these adjustments, retain the illumination needed for circulation routes and task areas. Where a particular background needs less emphasis, adjust the relevant part of the scheme while reviewing its effect on the surrounding space.
The relationship between ambient and accent lighting depends on materials, merchandise and viewing positions. The design team should establish project illuminance levels and other requirements for the intended activities and applicable criteria, then confirm the scheme through calculations and on-site review.
4. Aim accent lighting at the surfaces customers need to see
Consider the product and fixture positions together when planning accent light. A beam that illuminates a display platform, back panel or product top may leave the front and important details insufficiently lit.
For example, a tall display stand may obstruct light to the lower part of a product. Light coming directly from above may also produce shadows on the product front or its label. Start by reviewing aiming, fixture position and obstructions, then consider changes to the light distribution or additional illumination where needed.
Include glass and glossy materials in the same review. Merchandise may appear well illuminated from the installer’s position, while a customer sees a reflected light source or a highlight obscuring details. After each accent adjustment, return to the main customer viewing positions to check the result.
Where ceiling and showcase lighting operate together, define their separate contributions. Ceiling accents may illuminate a freestanding display or a selected presentation area. Linear or accent lighting inside a showcase can address merchandise and labels according to the cabinet structure. Review the combined result for excessive local brightness, shadows and new reflections.
For a showcase that needs both continuous illumination across a row and emphasis on one position, see our article on combined linear and accent lighting for display cases. Assess a combined fixture against the positions each type of light needs, available mounting space and required adjustments.
5. Review each lighting group separately, then together
Viewing the space only with every fixture switched on can make it difficult to identify which group causes a problem. If the scheme requires ambient, accent or task lighting to be adjusted independently, specify that requirement during design and confirm that the selected fixtures and controls support the intended functions.
Where the mockup or installed scheme allows separate group checks, use the sequence below. Include merchandise, props, glass and backgrounds close to the final arrangement.
| Review step | Main observations | Possible adjustments |
| Check ambient lighting separately | Whether routes, walls and surrounding displays are clear; whether any background attracts excessive attention | Adjust the relevant illuminated areas, fixture positions or supported brightness settings |
| Check accent lighting separately | Whether light reaches the target and reveals the product front, edges and details | Adjust aiming, product placement or light distribution, and review obstructions from props |
| Check task lighting separately | Whether labels, try-on areas and work surfaces are clear | Review people’s positions, shadows and reflections, then adjust the relevant lighting |
| Check all lighting together | Whether the focal point is clear, other merchandise remains visible and adjacent areas work together | Review the relative contributions and any highlights, shadows or reflections created by the combination |
Consider an illustrative handbag display scenario: With the background, shelf lighting and product accent all switched on, the background sign appears prominent while the front of the bag looks dark. Separate checks show that the accent mainly reaches the top of the bag and a tall stand obstructs light to its lower portion.
Start by adjusting the relationship between the accent fixture and the stand so light reaches the surfaces to be presented. Then add the ambient and shelf lighting and review the brightness relationship between the sign and the featured product. Finally, check from the entrance, the side of the aisle and the close viewing position to establish whether the changes affect neighboring products or labels.
After reviewing the combined layers, also check the color appearance of merchandise receiving light from several groups. Showcase and ceiling lighting together can affect how leather, metal and packaging appear. Include representative products in this review.
For stores with substantial daylight, review representative daytime and nighttime conditions. Photographs help record adjustments, but automatic exposure changes the apparent brightness relationships in an image. Viewing the display in person should remain part of approval.
6. Record the accepted lighting arrangement
After the on-site review, organize the following information for the design, installation and merchandising teams:
- Featured merchandise, supporting displays and main viewing positions.
- Fixture positions, aiming targets and permitted adjustment directions or components.
- Ambient, accent and task lighting groups, with applicable settings.
- Merchandise, props, backgrounds and glazing used during approval.
- Photographs from representative viewing positions and records of relevant adjustments.
The team can use these records when merchandise or props change. If product heights, backgrounds or focal points move, check whether the existing accent still reaches the surfaces that need to be shown.
When discussing layered retail lighting with SEEPOSH, start with a plan of the space or display area, key dimensions, background materials, merchandise layout and intended focal points. For an existing store, overall photographs and a simple sketch can help explain the current issue.
We can discuss fixtures, light distribution, dimensions and control configurations around the project requirements, and identify what needs to be confirmed in a mockup or on site. Explore our customization process, or send drawings and reference photographs through our contact page.
Frequently asked questions
Do ambient and accent lighting require separate fixtures?
Start with the positions each role needs to illuminate. Some areas suit separate fixtures, while some showcases can be assessed for fixtures combining linear and accent light. Where separate switching, aiming or dimming is required, confirm which functions the selected configuration supports.
Why does a product lack emphasis even when the accent light is bright?
Check whether light reaches the surfaces to be presented, whether props obstruct it and whether the background or illuminated signs attract excessive attention. Review the display from customer positions to see whether reflections or local highlights interfere with product details.
How should I set the brightness relationship between ambient and accent lighting?
First meet the illumination requirements for the space and its tasks, then review the focal points with representative merchandise and materials. The same fixture output settings can produce different results with different backgrounds, glazing and product finishes. Use calculations, mockups and the main viewing positions to establish a suitable relationship for the project.


